Over the weekend I was feeling a bit adventurous in the kitchen, which could be due to the holiday season. After going back and forth between various dishes, I settled on smoked coriander chicken. 

The uniqueness of this dish is coriander cooked with the dhungar (smoked) method. I have not had many protein Indian dish in which the primary spice was coriander. I must say that it tastes pretty good. Dhungar on the hand, is used in many of the Indian dishes from rice, veggies, to meats. My mom often makes dhungar rice dish called dar chawal. It gives a wonderful smoky flavor, as well as a fantastic aroma to the dish.

Prep time: < 20 min
Cook time: ~30 min

Ingredients:

2.5 lbs chicken (I used thighs and drumsticks)
1 whole onion
3 tomatoes
1 serrano chili
2 1/2 tbsp ginger-garlic paste
4 tbsp whole coriander
2 tbsp cashews
2 tbsp tomato paste 
2 tbsp jeera
2 tbsp grated coconut
~3 black peppercorn
1 cinnamon stick
2 cloves
2 tbsp olive oil
salt to taste
Cilantro for garnish

For Dhungar
1 charcoal
small piece of foil
1 tsp ghee

Method:

In a pan add chicken, salt, 2 tbsp ginger-garlic paste, chopped onion, 2 chopped tomatoes, chili slit halfway. Bring this to boil (chicken should be almost done).

Grind tomato, coriander, cashews, tomato paste, jeera, grated coconut, and 1/2 tbs ginger-garlic paste into a fine paste. 

Heat oil in a pan on high, add black peppercorn, cloves, and cinnamon stick. Transfer the paste and saute for few minutes. Then transfer the chicken mixture slowly, combining it with the paste. Let this cook for minutes.

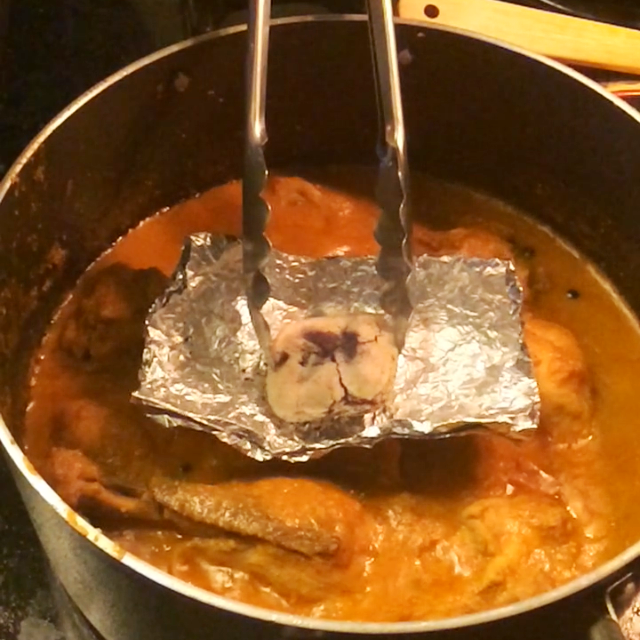
Once the chicken is done, turn off the stove, the next step is dhungar. Heat the charcoal on stove until it is red. In the meantime take a piece of foil make it into a small bowl shape and place it in the middle of the cooked chicken dish. Once the coal is ready place on top of the foil, pour ghee, and close the lid tight. Let this sit for 15-30 minutes until the smoke clears.  It is important that you do not open the lid until the smoke has cleared otherwise you will loose the dhungar taste.


Open the lid right before serving, and garnish with cilantro. The dish can be serve with rice, parathas, phulkas, or roti.

The last few months have flown by, with a  new job (yay!) and with other things going on personally it has been hectic to say the least. And I have missed blogging! Now that I finally feel settled in, hopefully I will be more active in my cooking-journey as well-posting more new recipes in the coming year.

Last weekend, after a few months of hiatus in the kitchen, I decided to make homemade burgers with an Indian twist.  The burgers are fairly easy to make, and the only time consuming part is making the patties.


Prep time: ~15min
Makes 7 burger patties

Ingredients:


2.5 lbs ground beef

1/2 tsp Turmeric
1 tbsp Ginger-Garlic paste
1tsp garam masala
4 slices of dried Bread
1 bunch Cilantro
1/2 tsp Tandoori Masala
2 tbsp Olive Oil
Salt to taste

Method:


Soak the bread by running it under water, and squeeze the excess water out.  Add the bread to the food processor with some ground beef and mix it together. Transfer the mixture to a large bowl, add rest of the meat, turmeric, ginger-garlic paste, garam masala, tandoori masala, salt, finely chopped cilantro, drizzle olive oil (2 tbsp). Mix all the ingredients together.  Once everything is blended well, section off the meat and start forming patties.


In a nonstick pan add a drizzle of olive oil, and cook patties for about 2-3 minutes on each side. 


That's it!  Now you can assemble the burger with your favorite condiments and fixings.


I must say I'm loving cooking with the pressure cooker. All I have to do is the prep work and the pressure cooker does the rest. This is my third time using the pressure cooker, but I think I will be using it a lot more in the future.

A couple of  days of ago I made peppered lamb curry in the pressure cooker. This dish required minimal prep work, and the pressure cooker cooks the lamb perfectly.


Prep time: 10 minutes

Cook time: 30 minutes
Serves: 5

Ingredients:

1 1/2 lbs of lamb leg (cut in pieces) 
1 1/2 onion (roughly chopped)
1 potato
3 tomatoes (roughly chopped)
1 tsp Ginger-Garlic paste
1 1/2 tsp black pepper
1/2 tsp cumin
1/2 cinnamon stick
2 cloves
1/2 tsp dhaana-jeeru masala
3 tbsp Ghee
1 green chili
Salt to taste
3/4 cup water
Cilantro for garnish

Method:


Add lamb, tomatoes, onions, ginger-garlic, cumin, cinnamon stick, cloves, dhana-jeeru masala, ghee, chili (slit halfway), and salt in the pressure cooker. Cook these ingredients on high heat for about 8 minutes (until the water starts coming out of the lamb). Add water.


Then close the pressure cooker, and after the first whistle turn the heat to medium. Let it cook for extra 15 minutes. 

While the lamb is cooking, do the following: coarsely grind the peppercorn and set it aside. Also, peel the potato and cut it into thick slices and set it aside as well.  


After the fifteen minutes are done, set aside the pressure and do not open until the all the pressure is released. Then add the potatoes, cilantro, and black pepper. Let all this cook on high heat until the potatoes are cooked.

You can serve this dish with khichdi,toasted bread (plain or garlic), and naan.


Let me know how it turns out. 


In many Indian homes the most basic staple of food is roti (flat bread). It is eaten with curry as well as variety of different foods such as pickle, chutney, raita or simply with honey or jam . To most older generation of Indian women, knowing how to make roti is a right of passage in learning to cook Indian food. It looks simple enough but it is an art form requiring practice (lots of it) and patience.


Over the years I have seen my mom make roti countless times, on occasions I have even helped cook it on the tawa/griddle. Yesterday, I made my own roti, merely four, but it took me awhile, and all those years of "watching" my mother making it did not help. Roti is suppose to be round and light, but my dough did not mix and it was a bit hard, making difficult making a round shape, which also I need a lot of practice in.

This is going to be my on going project. Over the course of next couple of weeks I am going to try and make roti everyday, hopefully in few days I will have a good hang of it, and I will post the recipe then.


Okra (bhinda) are one of my favorite vegetables. My Mom often makes them with potatoes as a side dish for the main course. I only like them as a semi dried dish, but not as a curry. I have yet to taste okra curry that I like. This recipe is courtesy of my mother, and this is her "go to" okra and potatoes recipe which she serves with the main dish of kichdi and khadhi.


Prep time: <15 minutes

Cook time: < 15 minutes
Serves: 4

Ingredients: 


1 lbs Okra

3 potatoes
1 large tomato 
1/2 tsp onion seeds
1/2 tsp cumin
1 tsp ginger & garlic paste
1/4 tsp turmeric
2 tsp tomato puree
1 tsp coriander-cumin powder
4 tbsp oil 
Oil (enough to fry okra & fries)
salt to taste

Method:


Wash the okras, and dry them on a towel (tip: never wash okra once they are cut-- otherwise they will become slimy). Then cut off the tip and slit them lengthwise. Wash and peel the potatoes, and cut them into long thin slices  (similar to french fries). Soak the potatoes in cool salted water and set it aside. Heat oil on high, and add the okras. Once they are semi crispy, remove and set it aside (cook time for the okras is less than five minutes.  You don't want to over cook the okras). In the same oil, add the potatoes and fry them to a crisp. Once done, remove and set it aside.


Chop the tomato roughly and run it through the food processor until liquidized.


In a pot add oil (4 tbsp), once the oil is hot add cumin, and onion seeds. Once they start spluttering reduce the heat to medium and add ginger-garlic paste, turmeric, tomato puree, coriander-cumin powder, and tomato sauce. Let the the mixture saute for few minutes until it thickens.  Then add okras, potatoes, and add salt to taste. Mix the ingredients well, and let it cook for a couple of minutes. 


In a long list of variety of ladoos, sev ladoo, are by far my favorite. I still remember when I first tasted it, it was little ball of heaven. Unfortunately, I used to only have them once a year, but after making them myself, I will most definitely try and make them as often as I can. 


Ladoos are a type of Indian sweet, most often made during festivals, weddings, and any celebratory event. I always thought it was a difficult process to make these, but  they are quite simple to make, but it require time.  I know I must sound like a broken record because most of the things I have attempted to cook has been pretty straight forward and simple. But I must say that these turned out really well, in fact so well that I airmailed them to my sister and she ate 7 of them in one sitting!

Prep time: 60 minutes
Makes: 46 ladoos

Ingredients:


300g roasted Vermicelli

2 1/4 cup Khoya (Mawo)
60g fine sugar
1 cup almond
1 cup pistachio
2 tbsp Ghee
Saffron (a pinch)
2 tbsp Milk
Cardamom powder to taste

Method:


Grind almond and pistachio separately into a powder. Khoya comes packaged as a block of cheese, the best method is to grate it


In a large bowl, combine almond, pistachio, khoya, sugar, and a pinch of cardamom powder. 


In a small bowl add a pinch of saffron and then add milk. Microwave it for few seconds (`30 sec)- enough for it to dilute with the milk. Add this to the mix above.


Crush the vermicelli into small pieces. In a pan heat ghee on high and then add vermicelli. Since the vermicelli is roasted it only needs to be cooked for few minutes. Stir continuously until it is warm. Then add vermicelli to the large bowl containing rest of the ingredients, and mix it well, combining all the ingredients. 


Then roll the mixture into small round-shape balls. That is it! 

Let me know how it turns out. 

Over the weekend I baked for the very first time! I decided to make pistachio biscotti. It sounds fancy,  but if you have experience baking before it is very doable. The recipe I used is from My Indian Kitchen by Hari Nayak. I have tried his recipe before (here), and just like before this recipe was also simple and easy to follow with good results.


Since this was my first baking experience I found it difficult to work with the sticky dough, in hindsight I should have used the mixer, instead of 'folding' the dough myself. I think it will take a few more sessions before I become comfortable with baking. 


Prep time: 30 minutes
Makes 26 biscotti

Ingredients: 


*1 1/4 cup all-purpose flour

1/2 cup sugar
1 tsp baking powder
1 cup unsalted pistachios
2 tsp grated orange zest
*3 eggs beaten

Method:


Preheat the oven at 350 degrees. In a bowl, mix flour, sugar, baking powder, pistachios, and orange zest. Make a well in the center, then add eggs and fold them into the mixture to make a sticky dough.


Divide the dough into two equal sections on a clear floured surface. Using your hands roll each section into a log approximately 1.5 inches in diameter. Place each log onto an oiled baking tray (cooking sheet would work better, but I didn't have any), leaving space between for spreading.


Bake for 30 minutes. Remove the logs from the oven and allow it cool. Decrease the oven temperature to 275 degrees.


Once the cookie logs have cooled down, using a knife cut the logs into slices. Place the cut-side down and return them to the oven for approximately 20 minutes, or until the cookies are slightly brown on the sides--turn them once for equal baking.  


Note

* The original recipe calls for 1 cup of flour and two eggs. However, in my case the 2 eggs were not sufficient for the mixture to turn into dough therefore I added one more egg and some extra dough as needed. 


One of the most refreshing summer drink made by mom is a yogurt based drink with little bit of jeera (cumin). It is deceptively simple to make. Believe it or not this was my first time making it, and it turns out the blender does all the work!

This is drink often served with biryani and can be salty or sweet (lassi). I have tried the sweet version, but my preference is for salty.


Prep time: 5 min or less

Serves: 3 glasses

Ingredients:


2 cup plain yogurt

1/2 tsp cumin powder 
salt (to taste)
2 cups water
1 cup ice (or water)
Mint (for garnish)

Method:


In a blender add yogurt, cumin powder, salt, water, and ice. Blend until the mixture becomes frothy. And that's it!


Pour the mixture into glasses and garnish with mint.  


Notes:


You can adjust the quantities yogurt and water based on the consistency you want. 


If you are planning on serving at a later time, do not add ice while blending, otherwise it will loose its consistency.  Add couple of ice cubes or keep it chilled in the refrigerator. 


Over the weekend I made a simple tandoori masala chicken dish. This is one of the dishes that is universally appealing whether you like Indian food or not. It is a very simple, straightforward, and great for the summer get-togethers. I served the chicken with a side of cabbage and onion slaw. It provides a nice balance of sweet and tangy. 

For the chicken:

Prep time: 10 minutes
Cook time: 45 minutes

Ingredients

12 piece of skinless chicken drumsticks
3/4 cup plain yogurt
1.5 tsp Tandoori Masala (readily available at Indian grocery store)
2 tbsp Olive Oil
Salt (to taste)

Method:

Prep the chicken by making a small slit on each side. Transfer the chicken into a bowl and add yogurt, ginger-garlic paste, tandoori masala, and salt to taste. Mix well and set aside in the refrigerator for 1-2 hrs.


After 1-2 hrs, transfer the chicken and the marinade to a oven pan and broil on low until the chicken is cooked thoroughly (about 45 minutes). About half way through make sure to turn the pieces over. 

For the cabbage-onion slaw:


Prep time: 15 minutes

Ingredients:

1 small red cabbage
1 medium size red onion
 salt (to taste)
1.5 tsp sugar *
1/3 cup vinegar*

Method:


Thinly slice the cabbage and the onion, the thinner the better. In a bowl mix the cabbage, onion, salt, sugar, and vinegar. Let the mixture soak before serving.


*I would recommend you adjust the sugar and vinegar according to your taste, balance of sweet and tangy.


There is nothing like a home made dessert. A couple days ago I decided to attempt my very first dessert. The egg pudding is one of those desserts that requires few ingredients but the taste is satisfying and so delicious. The pudding turned out well, but it just 'cracked' when I turned it over. 

Ingredients:


For the caramelization:


3 tbsp sugar

*3 tbsp water 

In a cooking pot add sugar, and water *(enough water to to wet all of the sugar). Heat the mixture on high, occasionally swirl the pot for even spread until the sugar start turning golden brown. Set aside.

For the egg pudding:


3 cups of Half & Half

3 eggs
4 tbsp sugar
Vanilla Essence 
Yellow food coloring

Method:

In a bowl combine and whisk Half & Half, eggs, sugar, a couple drops of vanilla essence, and a pinch of yellow food coloring. 

Crack the caramelized sugar, then transfer the whisked egg pudding mixture to it.


In a pan create a water bath, and warm it on the stove top. In a preheat oven (350 degrees) place the water bath and in it place the egg pudding mixture. Bake for 35-45 minutes (looks like this when done).


Let the pudding cool and then refrigerate. To serve, flip the pudding upside down in a serving dish.


Enjoy!


Pickles (achaar) are synonymous with Indian cuisine. Most Indian food is paired with a side of achaar to enhance the flavors of the dish. Achaars are typically made from variety of vegetables and fruits. In most Indian household there are always two to three achaars available at all time, and often times, a dish will be paired with more than one achaar.


For my very first homemade achaar I chose a vegetable called gunda (bird lime). They can be categorize as a berry and are very popular among Gujrati-Indians.  This achaar is simple to make. However, first it needs deseeding and the stickiness needs to be removed.

Prep:

1.5 lbs Gunda (bird lime)
10-15 Serrano chilies
1/2 tsp turmeric
2 tsp salt
Lemon juice (enough to soak both the gunda and chilis)

Cut the gundas in half (I suggest wearing gloves for this part) and deseed. Then, take the chili and slit it half way. Transfer both the gunda and chilies in a container--add turmeric, salt, and enough lemon juice to cover the both the gunda and the chilies. Set aside for 4-5 days, this will remove the stickiness and give it a lemon flavor.


Now for the achaar itself:


Ingredients:

3 tbsp achaar masala (should be readily available at local Indian store)
1 tsp turmeric
3.5 tbsp coriander & cumin masala
2 tbsp ginger-garlic paste
3/4 cup of oil
1 tsp kashmiri chili 

In a bowl combine achaar masala, turmeric, coriander & cumin masala and set aside.


In a pot heat oil on high, and then add ginger-garlic paste and stir for a minute and add masala from the bowl we had set aside. Cook for only 1 minute or two until fragrant. Turn off the heat and add the kashmiri chili, set it aside until the mixture cools down.


Once the masala-mixture cools down, strain the gunda and chili and add it to the masala-mixture. Combine the mixture thoroughly.


On Monday, for dinner I made a South-Indian dish called beef vindaloo. What attracted me to this particular dish was it's name, vindaloo, it's one of the words that just fun to say-it just rolls of your tongue, vin-da-loo!!. 

There are two main components of vindaloo:  chilies and spices.  The more chilies you use, the bigger the punch it will pack. However, not everyone in my house can handle spicy food, so I made a mild vindaloo.  You can adjust the level of chilies according to your taste. 


Spices, on the other hand, make the dish. It is very much spiced based and includes a few more then my previous recipes. 


I was very happy with the way it turned out. However, as I was doing my research on how to make this dish, I came across several different versions.  Hopefully I will get a chance to make the "traditional" vindaloo that is spicy and includes the use of vinegar.

I served this dish with white rice, but I could have added more water to make it saucier.


Ingredients: (serves 4)


*Beef (1 lbs)

1/2 cup diced onion
1 1/2 tsp mustard seeds
*1 dry red chili 
1 tsp ginger-garlic paste
1 tsp cloves
3 cardamom
1 1/2 cinnamon stick
1/2 tbsp peppercorn
1 tbsp cumin
3/4 tsp turmeric
2 tbsp lemon juice
4 tbsp olive oil
Salt 
Cilantro 

Method:

In a coffee/spice grinder, add dry red chili, cloves, cardamom, cinnamon sticks, peppercorn, cumin, and grind to a fine masala powder. Transfer the masala mix in a bowl, and combine it with ginger-garlic paste and turmeric. Set it aside.


In a pan, heat olive on medium heat and add mustard seeds. Once the mustard seeds start to pop add onions. When the onions start to turn light golden brown add the beef and stir for few minutes. 


Then mix in the masala which was set aside, and add salt to taste.  Stir the mixture for few minutes until  it is fragrant. Add approximately 1/2 cup of water and bring it to simmer. 


Lastly, add lemon juice, and on a low heat partially cover the vindaloo until the liquid is half reduced and the meat is cooked thoroughly.  Once done, garnish the dish with chopped cilantro.


*Note: you can adjust the number chilies according to your taste.  For the list of Indian spices revert to previous post.  


My all time favorite Indian dish has to be my Mom's coconut chicken curry. I could eat this everyday and never get tired of it. The combination of coconut with the rest of the ingredients gives it a rich creamy taste. Plus is versatile enough to serve with this with either rice or naan. 

I called my Mom up to get the recipe and it turns out it is pretty straight forward. It requires basic ingredients, few minutes of prep work and the pressure cooker does the rest. I am so proud of myself that it turned out really well (yay!). After few fiascoes, things are starting to looking upward.    

Ingredients: (serves 4)


Skinless chicken thighs (4 pieces)
1/2 onion
1 tomato
1 green chili
1 tsp ginger-garlic paste
1/4 tsp turmeric
Salt 
1/2 can of coconut cream

Cilantro
1/2 cup water

Method:


For this recipe, first chop the chicken thighs in half so you will have total of six pieces, and place them in the pressure cooker. Chop the onion and the tomato, and slit the green chili halfway and place it in the pressure as well. Add the ginger-garlic paste, turmeric, and salt (to taste). 


Mix all the ingredients together and on a medium heat let this sauté for approximately 30 minutes. Then add 1/2 cup of water, close the pressure cooker, and let it cook till the first whistle goes off. Turn off the heat and let it sit there until the pressure is released. Open the pressure cooker, and add the coconut cream. I used 1/2 a can, but you can add less or more depending on the consistency you want. Lastly, add cilantro for garnish.

Enjoy!


It is becoming increasingly difficult to think of something to cook for dinner everyday. As I am trying to cut down on meat consumption (my goal is to alternate-2 days of veggie, one day of meat) it is even harder to come up with vegetarian dishes/meals. Of course, there are plenty of dishes out of there, but very few I can actually cook with limited culinary skills, especially after my few 'fails' for the past couple I am treading the water carefully. 


Over the weekend as I was deciding what to make, I Googled "veggie dishes" and came across suggestions to make patties. I did not have all the ingredients to "follow" a specific recipe, therefore I made own version of veggie patties. 

These were simple and easy to make, there was no fuss involved. These veggie patties would make great appetizers (smaller portion) or afternoon snacks. 


Ingredients: (makes 12 patties)

15 oz of Garbanzo beans

4.5 cups of mixed veggies
3 eggs
breadcrumbs
1 tsp ginger & garlic paste
1 1/3 garam masala tbsp
1/3 cup cilantro
1/2 tsp black pepper 
Salt
Oil Olive

Method


First, boil veggies (add the garbanzo beans when the water starts boiling). After straining, move the veggie in a large bowl and roughly mash. Add the ingredients:1 lightly beaten egg, 1/2 cup of breadcrumbs, ginger garlic, garam masala, cilantro, and salt. Mix well and let it sit for few minutes.


Form the mixture into patties.  Whisk 2 eggs in a bowl, and in a separate plate pour a layer of breadcrumbs. Dip the patties in eggs, covering both sides, and then coat both sides with breadcrumbs, and fry until golden brown.


Over the last couple of weeks I have made several items. However, it turns out that I have a heavy hand when it comes to spices, especially salt. Couple days ago I made minced beef curry, and it was so so salty that even when I made second batch without a pinch of salt it still would not offset the salt when combined. It is safe to say it was not a pleasant dinner.


I need to learn balance between the spices and rice/curry. I think at this stage I need to follow recipes to the tee, and hopefully in the near future I will be able to deviate, and tweak the recipe here and there. Fingers-crossed.


After spices, ginger-garlic paste is the second most used ingredient in Indian cooking. The paste is a staple in almost all of the Indian household refrigerator. It is super easy to make and the batch can last up to 5 months in the refrigerator. 


Ingredients:

Ginger 1 cup
Garlic  2 cups

Method:


Peel the ginger, and garlic. Coarsely chop ginger into pieces approximately the size of garlic.  


Blend the ginger and garlic together in a food processor. That's it, no need to add water it will blend on its own into a smooth paste.


Transfer the paste in a glass jar with lid and store it in the refrigerator. When handling the paste always use clean, dry spoon. 


*Depending on the amount of paste you want to make just remember the ratio is 1:2 ginger to garlic.


*you can add salt to the paste when blending, but just remember to reduce the amount of salt when cooking.


One of my main aversions for cooking was the time it takes to cook a meal. Growing up it seemed my mom spent her whole day in the kitchen. She was always dashing in and out of the kitchen, and I remember thinking how laborious it must be and I decided this is something I want to avoid, I had better things to with my time. But it turns out she likes to cook in stages. First she will make rice, then couple of hours later she would make the curry, and then maybe take another break, and finally go back in to make something else.

To get into the momentum for my first dish, I wanted to cook something simple, fuss free, and quick. A week earlier I had checked out from my local library Hari Nayak's My Indian Kitchen, and as I was browsing through the book, I came across the recipe "Chicken curry in a hurry", a perfect title and my first dish!

I must say, for my first dish it turned out pretty well. It didn't require any "techniques", and it was was simple enough to make. 


I served the curry with rice but I think it would have been better served with naan (Indian flat bread).


Prep time: 10 minutes (if you know your way around the kitchen it will be considerably less)
Cook time: 30 minutes
Serves: 4

Ingredients:

600g skinless chicken thighs (you can use chicken breasts as well)
1 large onion
1 green chili pepper (or to taste)
¼ tsp turmeric
1 tsp cumin seeds
1 tsp garam masala
1 ½ tsp garlic-ginger paste (or use fresh ginger and garlic)
2 tbsp tomato paste
1 tsp salt (or to taste)
4 tbsp oil
(?) water
Chopped cilantro for garnish

Method:


Peel, then coarsely chop the onion and place it in a blender. Add green chili pepper, turmeric, cumin seeds, ginger-garlic paste, and process. Add a tiny bit of water to make into a smooth paste.


Heat the oil in a sauce pan over high heat. Add the chicken, and salt; stir frequently until the chicken is golden brown (approx 10 minutes). Remove the chicken from the pan and set it aside.

Now, over  low heat, add the spice paste to the pan used to cook the chicken. Cook it for about 2-3 minutes (until it becomes fragrant). Then add the chicken, tomato paste, and the garam masala. Gently stir for about another 4 minutes.


Add 1/2 a cup of water, increase the heat to medium, and cover the pan. Mr. Nayak's recipe says to simmer for about 15 minutes, but I had to let it simmer close to 30 minutes until my chicken was thoroughly cooked.


Garnish with cilantro.